Neon lights
Getting to a neon light effect in Photoshop is very easy. But you don't want to use an ordinary Outer Glow blending option if you want to get a good effect. You need a twist. And that's were gaussian bluring comes in. We start with a 400x200 px blank image. We fill it with black so we have a nice contrast with the neon light effect. Use the type tool to write your text. I've used a font called Neon, but you can use any font you like.
 Now select the type layer and use Ctrl+J to duplicate that layer four times. Use Filter->Blur->Blur more on the top layer. Photoshop is going to ask you if you want to rasterize the type layer. Click ok. Then use Filter->Blur->Gaussian blur on the second layer from the top with a 6 px radius. On the third layer use 12 px radius gaussian blur and on the fourth layer use 18 px gaussian blur. Obviously you can toy around with this settings, these are just the ones that work best for me.
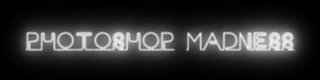 Now you should merge the 4 top layers. Select the top layer and hit Ctrl+E 3 times. Right click on the layer you just merged and select blending options. Click Outer Glow and select a color from the choose color dialog box. Green, pink and blue goes well with neons but it's ultimately your choice. This is my resulting image using a blue outer glow:
 Now select the type layer and use Ctrl+J to duplicate that layer four times. Use Filter->Blur->Blur more on the top layer. Photoshop is going to ask you if you want to rasterize the type layer. Click ok. Then use Filter->Blur->Gaussian blur on the second layer from the top with a 6 px radius. On the third layer use 12 px radius gaussian blur and on the fourth layer use 18 px gaussian blur. Obviously you can toy around with this settings, these are just the ones that work best for me.
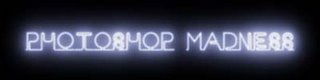
 Now you should merge the 4 top layers. Select the top layer and hit Ctrl+E 3 times. Right click on the layer you just merged and select blending options. Click Outer Glow and select a color from the choose color dialog box. Green, pink and blue goes well with neons but it's ultimately your choice. This is my resulting image using a blue outer glow:
Save to Del.icio.us |
Furl It | Digg
| Permalink ![]()
![]()
This looks just... OK
Thanks anyway
Posted by Anonymous |
January 27, 2006 12:47 AM
Anonymous |
January 27, 2006 12:47 AM
Whoa! This is impressive. I leaned back in my chair a bit and was just sitting here pondering everything you said. Really cool.
Posted by www.koglenlampe.dk |
April 15, 2016 1:39 PM
www.koglenlampe.dk |
April 15, 2016 1:39 PM