Lightning signature
We'll start by creating a new canvas (Ctrl+N) 500x100 px. Select as your foregroung colour a dark shade of blue and white as your backgroun colour. Now use Filter-> Render-> Clouds. Use Ctrl+J on that first layer to copy it onto a new layer. Then use Filter->Render-> Difference Clouds. Use Image -> Adjustments-> Levels and move the midlle grey slider to the left until you achieve the lightning effect.
 Use Ctrl+I on the difference cloud layer to invert it. Then use Ctrl+J again to copy that onto a new layer.
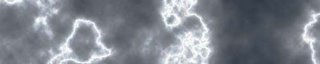 Use Filter-> Pixelate-> Mosaic with a 15 cell size square on the third layer. After that use Filter-> Brush Strokes -> Accented Edges with 3 edge width, 40 edge brightness and 4 smoothness. Use the Overlay blending mode on the third layer, then merge it with the second layer by selecting it then using Ctrl+E.
 On the second layer use Overlay blending mode then merge it with th
 Use Image -> Adjustments -> Levels to darken the image a bit by selecting the black slider and dragging it to the right.

 Use Ctrl+J on that first layer to copy it onto a new layer. Then use Filter->Render-> Difference Clouds. Use Image -> Adjustments-> Levels and move the midlle grey slider to the left until you achieve the lightning effect.
 Use Ctrl+I on the difference cloud layer to invert it. Then use Ctrl+J again to copy that onto a new layer.
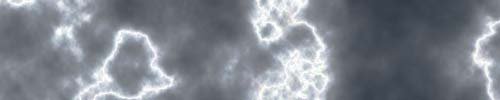 Use Filter-> Pixelate-> Mosaic with a 15 cell size square on the third layer. After that use Filter-> Brush Strokes -> Accented Edges with 3 edge width, 40 edge brightness and 4 smoothness. Use the Overlay blending mode on the third layer, then merge it with the second layer by selecting it then using Ctrl+E.
 On the second layer use Overlay blending mode then merge it with th
 Use Image -> Adjustments -> Levels to darken the image a bit by selecting the black slider and dragging it to the right.
Save to Del.icio.us |
Furl It | Digg
| Permalink ![]()
![]()
funky!
Posted by G |
April 08, 2006 12:43 PM
G |
April 08, 2006 12:43 PM
This is cool. I learned some cool stuff from http://codervods.com/Default.aspx where are quite a lot of video tutorials, but I see that there is no limit :D
Posted by CodingFather |
July 02, 2008 3:32 PM
CodingFather |
July 02, 2008 3:32 PM