Zebra flavoured shark
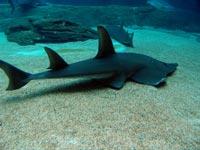
Using very simple techniques we will be skinning a shark with a zebra pattern. Pick your sources carefully, as they are the most important part. I've picked a zebra and a shark from www.sxc.hu, a very vast resource of free stock photography. You will need Photoshop CS2 to do this tutorial.

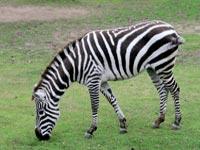

Open the zebra image in Photoshop, select a large portion of it, either by using quick mask or by using the polygonal lasso tool and copy the selected portion into the shark image into a new layer.
 Using the transform tool (Ctrl+T) on the newly created layer, position the zebra patch so it will more or less cover the shark.
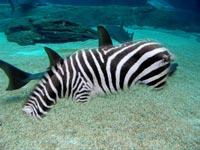
 Use Filter -> Liquify. Make sure you have "Show backdrop" checked and only use the Background layer with the "Behind" mode and a 50% opacity to see what you are doing. Start working with a big brush to move the zebra pattern to cover the shark. You can use the bracket keys [] to adjust your brush size as you need it.
With a lot of patience and trial and error you will soon have an image that looks a lot like this one.
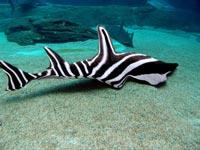 Using the Levels command I've darkened the zebra layer a little to give it a more aggresive feel.
Hope you've learned something from this.

Open the zebra image in Photoshop, select a large portion of it, either by using quick mask or by using the polygonal lasso tool and copy the selected portion into the shark image into a new layer.
 Using the transform tool (Ctrl+T) on the newly created layer, position the zebra patch so it will more or less cover the shark.
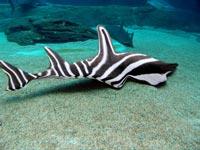 Use Filter -> Liquify. Make sure you have "Show backdrop" checked and only use the Background layer with the "Behind" mode and a 50% opacity to see what you are doing. Start working with a big brush to move the zebra pattern to cover the shark. You can use the bracket keys [] to adjust your brush size as you need it.
With a lot of patience and trial and error you will soon have an image that looks a lot like this one.
 Using the Levels command I've darkened the zebra layer a little to give it a more aggresive feel.
Hope you've learned something from this.
Save to Del.icio.us |
Furl It | Digg
| Permalink ![]()
![]()
Nice, I like it. I would of never thought to do something like that but it's a really neat effect.
Posted by Anonymous |
October 13, 2005 7:28 AM
Anonymous |
October 13, 2005 7:28 AM
Classic! looks good!
Posted by Anonymous |
October 13, 2005 2:39 PM
Anonymous |
October 13, 2005 2:39 PM
Very helpful...thanx
Posted by Anonymous |
October 13, 2005 7:12 PM
Anonymous |
October 13, 2005 7:12 PM
wow thats pretty kool i would of never thought of that lol
How did u cone up wit that?
Is there such thing a zebra sharks?
well git 2 go (g2g)
bye
Posted by Anonymous |
October 13, 2005 10:17 PM
Anonymous |
October 13, 2005 10:17 PM
noice
Posted by Anonymous |
October 15, 2005 2:09 AM
Anonymous |
October 15, 2005 2:09 AM
it's very nice it's a really neat effect.
Posted by Anonymous |
October 16, 2005 1:17 PM
Anonymous |
October 16, 2005 1:17 PM
Very good ^_^
Posted by Anonymous |
January 15, 2006 5:34 AM
Anonymous |
January 15, 2006 5:34 AM
This comment has been removed by a blog administrator.
Posted by Anonymous |
March 01, 2006 9:54 AM
Anonymous |
March 01, 2006 9:54 AM
Excellent job, I didn't expect that outcome. Thanks for the tips. I will try to do the same. There are a lot of tool that I don't know how to use in photoshop
Posted by General Viagra |
August 24, 2010 9:13 PM
General Viagra |
August 24, 2010 9:13 PM
Very interesting article you have got here. really good information. Thanks very much for sharing all this great informaiton.Thanks! and keep posting....
Posted by kANSAS cITY cOMMUNITY cOLLEGE |
February 28, 2012 4:26 AM
kANSAS cITY cOMMUNITY cOLLEGE |
February 28, 2012 4:26 AM